Until next time...
Friday, October 14, 2011
Cricut Art Philosophy: Shape-a-Day
Until next time...
Studio J: Love Your Layout {October 2011}
In this episode, you'll learn how to crop My Stickease to make custom titles and embellishments. With these techniques, you'll be able to make your layouts even more unique.
Create your own layout in 30 minutes or less in Studio J.
During October, YOU can get a Studio J 12-month Membership AND 5 layouts for FREE when you join my team! Just choose the Studio J Add-On Collection as your free add-on when you sign up to become a consultant during October. You'll enjoy making customized digital layouts in our fabulous Studio J Online Scrapbooking Program AND you'll receive the benefits of being a Studio J Member, as well as the discount from being a Consultant! Each layout works out to about $5.50 (with Indiana tax).
Until next time...
Wednesday, September 14, 2011
Studio J: Love Your Layout {September 2011}
Give Studio J a visit and see how fast and easy it is to create this beautiful layout in under 30 minutes! If you'd like more information, contact me to schedule your free Studio J session!
Until next time...
Monday, August 29, 2011
Studio J: Love Your Layout {August 2011b}
When you're done viewing the video, give Studio J a try for yourself. You'll be amazed at how quickly and easily your layouts come together.
Feel free to contact me if you'd like to learn more about our wonderful online digital scrapbooking program.
Until next time...
Tuesday, August 23, 2011
Studio J: Love Your Layout {August 2011}
If you'd like to learn more about Studio J, contact me to schedule your FREE Studio J class. You'll be creating layouts and preserving memories in no time!
Until next time...
Wednesday, August 10, 2011
Happy Holiday Card Set - Project Inspiration
If you'd like to create these cards for yourself, contact me to schedule a workshop. Workshop details are listed below the video.
I am going to be offering this as one of my Christmas Card Workshops. We'll create 10 cards using the products shown in the video. Here are your options:
Paper Only Kit $15.00 - Great for those that want to either schedule a workshop or attend my workshop and have a stash of embellishments to use. I will stamp your images for an additional $5, allowing you to complete your cards on your own. Please add $5 for postage if completing on your own.
- Die Cut Cards & Envelopes
- Pre-cut Cardstock pieces
- Pre-cut Cricut pieces
- Instructions
- Die Cut Cards & Envelopes
- Pre-cut Cardstock Pieces
- Pre-cut Cricut Pieces
- Bitty Sparkles
- Designer Ribbon - Red Collection
- Instructions
- Die Cut Cards & Envelopes
- Pre-cut Cardstock Pieces
- Pre-cut Cricut Pieces
- A Holiday Stamp Set
- Holiday Cheer Stamp Set
- Instructions
- Die Cut Cards & Envelopes
- Pre-cut Cardstock Pieces
- Pre-cut Cricut Pieces
- A Holiday Stamp Set
- Holiday Cheer Stamp Set
- Bitty Sparkles
- Designer Ribbon - Red Collection
- Instructions
If you have any questions, please feel free to contact me. Check my calendar for future workshops dates & times, or contact me to schedule your own!
Until next time...
Tuesday, August 9, 2011
Buttoned Up Card Set - Project Inspiration
You can also do this technique with several other stamp sets! Just choose a stamp set that has a solid shape, stamp in second generation, then add some various bling!
Let's see what you can come up with!
Until next time...
Tuesday, July 5, 2011
Studio J: Love Your Layout - June 2011
Let your imagination be your guide, and play and have fun creating YOUR layout with our Studio J online digital scrapbooking program. Let me know what you create with our program. If you need help, you can always contact me for help. There are also several more videos for Studio J here!
Until next time...
Saturday, June 11, 2011
Studio J: Perfect Placement
During June, you can receive one FREE Studio J JPG file of a layout that YOU create! You can use these pictures to share your layouts with friends or have them printed. You'll LOVE how easy it is to use Studio J and be creating fabulous layouts in no time!
Until next time...
Saturday, May 7, 2011
Studio J: Personalize Your Layouts
Until next time...
How to Add Dimension to Stamped Images {Tutorial}
Here's a quick tutorial on how I added a little dimension to make the flowers pop. You'll need a stamp that you can cut apart and layer back together. I used Heartfelt Treasures. You'll also need your micro-tip scissors, or another tool that has a rounded tip, and either the Versamat or the foam sheet that comes with each of our stamp sets.
Until next time...
Saturday, April 2, 2011
Sparkle with Studio J!
It’s time to make your Studio J® layouts sparkle! Create your own embellished studio layouts in a snap with clear Sparkles and Opaques Pearl adhesive gems.
Here's a step-by-step video to the basics of Studio J to get you started! If you have questions, please don't hesitate to contact me!
Until next time...
Saturday, February 26, 2011
Simply Scallops Tutorial
Visit my website to purchase your 2" Scallop Punch or any of the other products shown in the video.
Until next time...
Friday, February 25, 2011
Rosette Ribbon Tutorial
To purchase the new ribbons featured in the video, visit my website!
Until next time...
Sunday, January 30, 2011
Tips for Your New Spray Pen!
Until next time...
Wings Workshop on the Go Layouts and a Tutorial
The first set of layouts I finished up were the Wings WOTG Layouts we recently did. This is the workshop kit from the Inspirations brochure. It will be available through August 31, 2011! So if you missed my workshop - there's still time to get it and do it yourself! Or get together with your friends and call me - I'll be thrilled to come help you put it together!
One of the new things I'm doing with my workshops this year, thanks to a great friend and frugal customer, is issuing a "Use Your Stash" challenge. My friend generally orders the paper only kit, plus the My Stickease. Like most of the rest of us, she has tons of embellishments, so she'll ask me for the colors and she'll pull out what she has and we go from there. Now, while I generally purchase whatever the kit calls for, I LOVE this idea, and I actually put it to use this time!
Here's the layouts we created at our workshop.
This is the layout from the WOTG instructional guide. I used the Black/Sweet Leaf dot B&T to cut photo mats according to the sizes in the guide. This was a fun workshop with the new Spray Pens and reinker/pearl paint mixture!
This is the additional layout from the WOTG guide. It uses Lovely Assistant from Magic as the pattern. I added photo mats according to the pattern using leftover paper. I don't generally stamp my titles until I know what photos I'm going to use, but I try to complete them other than that. I'm not a huge butterfly person and the bold butterfly paper didn't really suit my tastes, so I just flipped it over and used the Sweet Leaf side.
This is the third layout we did. I'll be honest, I scraplift quite a bit for simplicity's sake. I saw this FABULOUS layout from Jeni Perkins and knew I could do something similar. The layout pattern is Back Stage from Magic. I changed the papers around a little based on what was left in the WOTG kit. She used Dimensional Elements On Target on her layout (at least that's what it looks like). I know I have them somewhere, but where eludes me right now. So, at the workshop, my friend and I were discussing what we could do and saw the same layout in the back of the new Idea Book done with buttons! I have buttons - or so I thought - come to find out, no I only have the Craft Clear Buttons. BUT with my circle punch, liquid glass, and the leftover B&T from the kit, I made the buttons work.
Here's a quick tutorial for the buttons. You'll need the Clear Craft Buttons, a circle punch (I used the one from Creative Memories), Liquid Glass, and scissors.
A note of caution - plan your page! I had a major headache last Thursday so was not going to try to plan more than two colors, but you certainly could! Have fun and let your creativity flow!
If you'd like to complete these layouts yourself, visit my Workshops page (above) and get the supply list. Then visit my website and order your supplies! Don't forget, the only way to get the stamp set that comes with it, is to order the Workshop on the Go Kit!
Until next time...
Sunday, April 11, 2010
Organization: Sponges
So, after I cleared off my little 2x4 table upstairs, I grabbed my sponge boxes, loose sponges, a couple of color swatch rings, some small binder clips, and my Round Tab Punch from Stampin' Up (I knew I bought that for a reason!).
Until next time...
Friday, November 20, 2009
'Tis the Season (continued)...
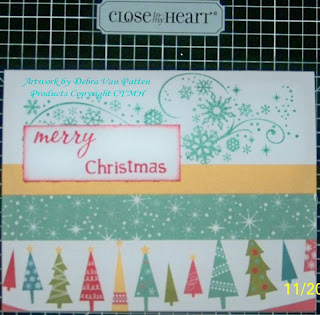
Today's card is Lucky Layers from Wishes. With a little planning, you can get 100 of these cards from one Level 2 Paper Packet.
Pattern: Wishes - Lucky Layers
Papers: Jingle Level 2 Paper Packet
Stamps: December Word Puzzle (retiring), Snow Flurries
Inks: Tulip, Juniper
Accessories: White Cards & Envelopes Value Pack
Let me share with you how...
If you take a look at Close To My Heart's Level 2 Paper Packets, you might notice there tends to be 3 bold or more prominent patterns and 3 sublte or accent patterns in the Background and Texture Duos. And, since they are coming from the same paper packet, all patterns and colors are meant to coordinate with each other - LOVE that!
For this card, I used the Jingle Level 2 Paper Packet. If you look, you'll notice that the Presents, Ornaments, and Swirl Border B&T's make up your bold patterns. The Tulip Dots, Juniper Stars, and Stripes make up your subtle patterns. You get 2 sheets of each pattern - for a total of 12 B&T papers!
Take your 6 bold patterns and cut pieces 1 1/4" x 5 1/2". Watch how you cut, so your patterns will be running the correct way. You should get 18 pieces per paper, or 108 pcs per packet.
Now, take your 6 subtle patterns and cut pieces 3/4" x 5 1/2". Again watch how you cut (especially the stripes) so your patterns will run the correct way. You should get 32 pieces per sheet.
Then, take your colored cardstock and cut pieces 1/2" x 5 1/2". You should get 52 per sheet, so you won't need all of it.
Cut your White Daisy cardstock at 1" x 2 3/4". You should get 48 per sheet, so again, you won't need all of it.
Assemble card as shown in pic (I think you can click on it and make it bigger). I used the big snow flourish from Snow Flurries stamped in Juniper ink for the top portion of the card to fill in some of the white space. Stamp your sentiment (here, from the December Word Puzzle) on the 1" x 2 3/4" White Daisy. Sponge the edges to make it pop off the card and give the illusion of a mat.
And viola - you have 100 cards from one Level 2 Paper Packet - with minimal pieces and stamping!
Until next time...
Tuesday, November 17, 2009
'Tis the Season...
This year, I wanted something simple, but something that would represent me and my artwork and that I would be proud to send. I turned to my Wishes book. LOVE that book! Not only are there awesome cards and the instructions to make them, 3 different bulk card making workshops (complete with cutting guides), but also little tips and tricks to take your card making to the next level.
I don't know about you, but I tend to come up with one design and make oodles of that design for Christmas. I do make a few different cards - specific for who's getting them (ie., Carl's friends get something related to motorcycles and I do something mail related for the office). But the bulk of my cards are one design.
I started flipping through Wishes and the Idea Book, and was inspired by the Framework card on page 71 of the Idea Book. It was simple, yet doable for Christmas cards. However, it is also a 5x7 card. I wanted standard size. So, I worked at scaling it down to standard size (4 1/4" x 5 1/2). That's when I also realized you could get oodles of these cards from one level 2 paper packet. You can get 200 of this design from one level 2 paper packet. Yes, you read that right - 200! You'll have to add in the card bases, but it still works out to less than 50 cents per card - and they are hand made! Did you know there are actually several card patterns in Wishes that will allow you to get 100 or more cards per level 2 paper packet? That's AWESOME for Christmas Cards, Party invites, Thank You's and more!
So, you're probably thinking I've lost it (that's still debatable, depending on who you talk to). Let me share with you how....
Take the following papers and cut 2 1/4" squares from each (you'll get 25 per sheet) - Ornaments B&T, Juniper Stars B&T, Tulip Dots B&T, and Presents B&T. You should end up with 200 squares that are 2.25" x 2.25".
Take your Creme Brulee Cardstock and cut 2"x 1/2" pieces (cut 2" strips then cut them into 1/2" pieces). You'll have some cardstock leftover, but you'll get 200 pieces.
Take your Juniper and Tulip Cardstock and cut 100 squares from each color at 1.25" x 1.25". Again, you'll have cardstock leftover.
For your White Daisy Cardstock, you'll need to find an image that will allow you to get at least 50 per sheet. That's where the December Word Puzzle comes in handy - it's got small images that will coordinate beautifully with this paper packet (and many others). If you don't want to cut images out - making it even simpler, cut your White Daisy Cardstock into 1.5" squares. You'll be able to get 50 plus from each sheet - but you only need 200.
Layer your pieces on your card base as shown in the pic (I think you can click on the pic and make it bigger). For this card, I stamped the round ornament from the December Word Puzzle in Tulip ink and cut out. It is popped off the card with 3D foam (popdots). I stamped the word "merry" from Holiday Commentary in Juniper on the Creme Brulee CS, and then the word "Christmas" in Juniper directly on the card base. I added a little Cranberry Grosgrain knot to the top of the ornament - and viola - I have a simple, yet fun, Christmas Card.
Check back again (I'd like to say tomorrow, but I know better), when I'll share more card patterns from Wishes that you can get 100 or more cards from one level 2 paper packet! All it really takes is a little planning (and some graph paper doesn't hurt).
Until next time...
Thursday, November 12, 2009
Sweet Home Cards
For the glimmer mist, you'll need a small spray bottle (I found some at Walmart for 50 cents), re-inker, Create-A-Shade Pearl Paint and 91% Alcohol (you can also use water, but I use alcohol since it will dry faster and I'm usually a last minute type person). Pour some alcohol into your spray bottle, add a few drops of re-inker, add just a little of the pearl paint. One word of caution, the more paint you add, the thicker your mixture will be. It can clog your sprayer. I would not recommend mixing more than you'll use in one sitting. Shake well before using. Make sure you protect your work surface with newspaper or paper towel. I used an old cookie sheet with layers of paper towel. Gently spray your Just Blooms (or cardstock or whatever) and let dry.
Other: 91% Alcohol
Until next time...


