Home About Me My Calendar My Artwork Gallery Customer Care Program Idea Book Join My Team Shop Online Workshops On The Go Hostess Clubs Fundraisers Email Me For Sale Studio J
Showing posts with label 3-D Projects. Show all posts

Wednesday, September 5, 2012

Workshop on the Go {Spellbound}

With the Autumn/Winter 2012 Idea Book, Close To My Heart gave us a couple of "home decor" workshops as well as the card-making and scrapbooking workshops.  I have to say that I absolutely LOVE all of them, but I think that Spellbound is my favorite!


This fun and fabulous Halloween party workshop is designed to allow you to create a complete Halloween party for 8 people! You'll receive the papers, accessories, and instructions to create the following:
  • 8 Treat Bags
  • 8 Cupcake Liners
  • 8 Cupcake Picks
  • 8 Drink Wraps for pop/juice/Gatorade/beer bottles
  • 1 Banner (5pc) for decorating
The Spellbound Workshop on the Go Kit is designed to be a Cricut kit, used in conjunction with our brand new Artiste cartridge! Everything (except for the little bats on the cupcake picks) is cut using the Artiste cartridge!

Here's what you get in the kit:


1 – My Reflections® Spellbound Paper Packet (18 sheets, Exclusive to Kit)
1 – My Acrylix® Spellbound Cricut® Workshop Stamp Set (C-size)
1 – Sunset Baker’s Twine (10 yards)
1 – Foundry® Pin Clips (Z1612)
6 – Jump Rings (not shown)
1 – Instructional Brochure 
Retail Value $36.79
Your cost - $32.95 ($39.00 including shipping/tax)

Now, while I do LOVE this workshop, I know I won't be hosting a Halloween party.  So, I've made a few adjustments and come up with a few different options for you.  Do you have kid(s) in elementary school that still do the fall/Halloween parties? Would you like have your treats for Halloween packaged up in a cute bag?

Using the same kit and instructions, you can create the following:


30 Regular or Mini Cupcake Liners & Picks
You will need 2 additional packages of Foundry Pin Clips.
(Please excuse my styrofoam cupcakes.) 

OR

30 Treat Bags
(The treat bags shown in the first photo end up too small, so I've changed the bags.
You can choose from the square box, handled bag, or the pillow box for your 30 boxes.
All 30 boxes will be the same style.)
OR

30 Drink Wraps and the Banner (shown above, slightly modified)
(The wraps can be sized to fit any bottle under 5 inches in diameter.)
  
I am also offering a Paper Only Kit for those that do not wish to get the stamp set, or perhaps don't like the Spellbound papers.  The Paper Only Kit will feature the Moonlight Paper Packet, plus additional cardstock required to complete the projects.

Moonlight Paper Packet
6 additional sheets of Cardstock
Typed Instructions
(Instructional Brochure is not available separately)
Your Cost: $16.00  (includes shipping/tax)

I've also put together a couple of add-on options if you'd like the Moonlight Kit.
*Please note that the jump rings and instructional brochure are not available separately.

Additional Products Required

If you are local, our workshop is scheduled for Sunday, October 14, 2012, at 1pm ET.  Please RSVP with your kit selection and prepay by October 1st.  Please allow at least 5 hours for this workshop if you plan on cutting your own at the workshop (you will need to bring your Cricut machine). If I am pre-cutting for you, please allow at least 2 hours to complete the projects. You are welcome to cut and stamp all the pieces at the workshop, then assemble the projects at home as well.

Party for 8 Kit
  • Spellbound Kit $39
  • Moonlight Paper Only Kit $16
Cupcake Liners/Picks Kit (makes 30 liners/picks)
  • Spellbound Kit $50 (includes 2 additional pkg Foundry Pin Clips)
  • Moonlight Paper Only Kit $16 ($28 with 2 additional pkg Foundry Pin Clips)
Treat Bags Kit (makes 30 bags)
  • Spellbound Kit $39
  • Moonlight Paper Only Kit $16 ($22 with Bakers Twine)
Drink Wraps & Banner Kit (makes 30 wraps and 1 banner)
  • Spellbound Kit $39
  • Moonlight Paper Only Kit $16 ($22 with Bakers Twine)
If you do not have the Cricut Artiste Collection, or would like me to pre-cut your workshop, please add $5.


If you are not local, you can still complete this workshop, please add $5 for postage.  If you can't make my scheduled workshop on October 14th, get your friends together and schedule your own workshop. Check my calendar for available dates - I only have a few in October!

Until next time...
Debra

Sunday, August 5, 2012

CTMH *New* Product Blog Hop: La Belle Vie and Bonjour


It is one of the most exciting times of the year for Close To My Heart consultants and customers alike! August 1st brought us the NEW Autumn/Winter 2012 Idea Book (link will open in a new window so you won't lose your spot in the hop) full of NEW ideas and fabulous products!

If you've come from {Julia's Blog}, you're on the right path. We have over 50 Close To My Heart Consultants sharing their creations using some of our favorite NEW Autumn/Winter CTMH products on their blogs. This is simple to do - just click on the link at the end of the post on each blog to move to the next one! Here we go! 


I took a bunch of projects with me to our team meeting in Michigan this weekend, but only managed to get ONE completed (and that was last night back in my hotel room). I should have known better as I only go up once every year or so now, that I would spend more time visiting with great friends than creating.  I didn't even finish the fabulous projects that were taught at the meeting. Looks like tomorrow is going to be a creative day :)

I am working on a new display board for my gatherings (parties) this fall.  Basically, pick a date, then pick the make & take project you would like you and your guests to complete. I know I showed pictures earlier, but I think it's much better to have the actual projects to oooooh and aaaaaah over ;)  Here's one of the projects I'll be offering.


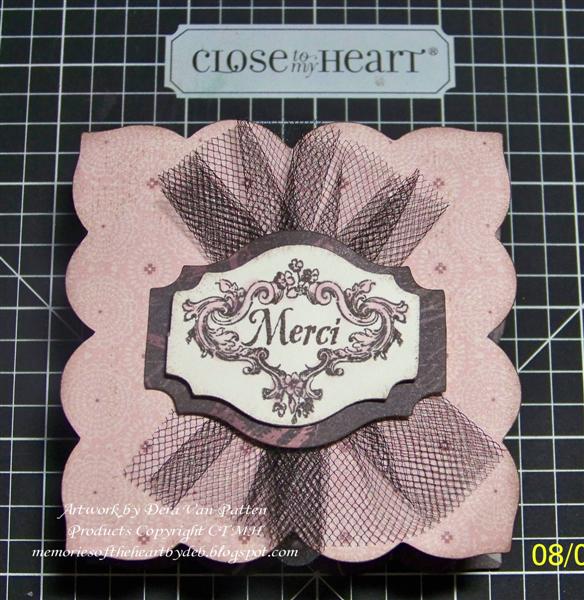
La Belle Vie Cricut Gift Box
Using the NEW Cricut Artiste Cartridge (link will open in a new window), I created this cute little box out of the new La Belle Vie papers.
Pink B&T top and bottom: 1" Card [MtherDay] (cut 2)
Pink B&T top box: 1" 3D Object [MtherDay]
Pink B&T bottom box: 1" Shift+3D Object [Mom]
Black B&T plaque: 1 1/2" Shift+Accent 3 [B]
Colonial White Cardstock plaque: 1 1/4" Shift+Accent 3 [B]
Black B&T accent strip: 3/8" x 11"

When cutting Cricut Artiste shapes that are the same color on the same key in the Artiste booklet, the finished size is indicated in red text next to the shape on the Artiste booklet page. In this instance, you’ll see on page 74 that the box should be cut at 1", meaning that the finished box will be 1" tall. All color-coordinating pieces on that key should be cut at the 1" size and will cut in proper proportion. You can adjust the size of the finished project, just remember to adjust the size of all the pieces :)


I assembled the box using Liquid Glass (for durability) according to the directions in the Assembly Instructions Booklet. Yes, our new Artiste Cartridge comes with an Assembly Instruction Booklet to show you how the projects go together. How cool is that?!

I used the new Bonjour My Acrylix Stamp Set to stamp the Colonial White plaque. Then, I used the water brush and Blush ink to color in the flourish.  I used 3D Foam Tape to adhere that plaque to the center of the Black B&T plaque for dimension.


I added a bit of the new Black Tulle Ribbon to the top of the box after fiddling with it to get it how I wanted. I used a glue dot to get it started, then added a small blob of Liquid Glass to the center, then added the plaques.  I set the box lid on a couple of My Acrylix Blocks to reinforce the lid, then put another block on top of the plaques to let the Liquid Glass set and dry.  I finished of the box with a Pearl Badge Button from the Wrangler Assortment.

Supplies
(links will open in a new window so you won't lose your spot in the hop)
Stamps: Bonjour
Inks: Black and Blush
Accessories: Black Tulle Ribbon, Wrangler Assortment
Tools: Cricut Artiste Collection, Bone Folder, Waterbrush, Liquid Glass, 3D Foam Tape

Now, hop on over to to {Georgia's Blog} to check out her fabulous Christmas card! Be sure to visit all the Consultants at their blogs to see some of the fabulous NEW products in our Autumn/Winter 2012 Idea Book. If you get lost along the way, the complete list of participants is here

If you are local, and would like to complete this project for free, contact me to schedule your home gathering with your friends and family! You can check out my calendar (link will open in a new window) for my open dates.

Until next time...
Debra

Thursday, June 17, 2010

Drink Recipe Book ~ Recipes

Thanks for all the wonderful comments on my Recipe Album for the CTMH Product Spotlight Blog Hop project!  Greatly appreciated.

I received a few questions as to how I attached the album to the glass.  I no longer have the glass as I used it as a gift, so I can't show pictures, but I'll try to explain.

I took our paper piercer and a lighter and heated up the metal tip of the piercer to get it very hot. Then I worked it through the plastic martini glass to make a hole.  It takes several times of doing this to get the hole big enough to put the ring through.  I did not want to risk cracking the flimsy plastic by using a hole punch or Crop-A-Dile. Although, you could try puting a piece of packing tape on both sides then punch your holes. Theorectically, the tape would stop it from fracturing.

I wrinkled up tissue paper to stuff in the glass.  Then I put a thin line of liquid glass around the rim of the glass and put the back of the recipe album on it. Actually, I probably turned the glass upside down and stuck it to the chipboard cover of the album. Let it dry completely.

For those of you wanting a few recipes, here's a few I have saved from the project.

Fruit Smoothie with Heart

1 cup nonfat milk
1/2 cup low fat flavored or plain yogurt
1/4 cup honey
2 cups frozen fruit - mixture of choice
1 banana
1/4 cup ice

Starting with liquids, place all ingredients in blender. Place lid on blender and blend until smooth.
 
Simple Strawberry and Banana Smoothie

1 cup plain yogurt
2 bananas
1 pound frozen strawberries

Place all ingredients into blender and cover. Blend on medium until desired consistency is reached.
Yield: 5 servings
 
Tropical Ice

1 can tropical fruit juice concentrate
2 bananas (broken into pieces)
2 1/2 cups ice cubes

Place all indredients in blender and cover. Blend on high until desired consistency is reached.
Yield 40 ounces
 
Lime Daiquiris

3 limes (juiced)
1/2 Cup white sugar
10 ounces white rum
6 cups ice cubes
4 maraschino cherries

In blender, combine lime juice, sugar, and rum. Blend and add ice one cube at a time until mixture is thick and smooth. Pour into 4 glasses and garnish with maraschino cherries. Yield: 4 servings
 
 
SunBurn

1/2 cup pineapple juice
1/2 cup orange juice
1/4 cup rum
1 tablespoon amaretto liqueur
3 tablespoons grenadine syrup
3 cups ice cubes

Place all ingredients in blender and cover. Blend on high speed until smooth. Yield: 4 servings
 
Until next time...
Debra

Tuesday, June 15, 2010

CTMH Product Spotlight Blog Hop {Just Blooms}

Welcome to this month's CTMH Product Spotlight Blog Hop! Each month, a group of CTMH Consultants get together to showcase a particular product.  This month, we are featuring our Just Blooms paper flowers. Our Just Blooms come in a variety of shapes, sizes and colors! 

If you've come here from Melinda's blog, you're on the right path. The hop is a circle, so continue through until you end up back here.  You'll get lots of fabulous ideas for our Just Blooms paper flowers.

For my project, I used the Just Blooms Summer Posies.  Summer Posies come in a tube of 100 flowers, in a mixture of 3 sizes and colors; leaves in 2 sizes. (Bubblegum, Sunny Yellow, Topiary, White Daisy)  They are currently $5.95, 34% off the regular price!

I created a mini recipe album using a My Creations Circle Album (retired).  For the cover, I attached the smallest flowers from the tube around the chipboard ring.


The recipes are printed on White Daisy Cardstock using our Expressive Font CD's then cut out with the circle coluzzle.
I attached the mini album to a plastic martini glass.

Now, hop on over to {Carol's blog} to see her wonderful project! If you find a link not working, or get lost along the way, the list of participants is below. You'll want to take a minute to visit everyone's blog!

Wendy K. http://www.myscrapbookingblog.com/
Tracy Oleksak http://mamaolie.blogspot.com/
Kristie Herdener http://www.goofyscrapper.blogspot.com/
Lori Brown http://savingmine.blogspot.com/
Haley D. http://inkyscrapper.blogspot.com/
Tracey Jean http://traceyjean.blogspot.com/
Jenifer Benner http://www.jensmessystudio.com/
Melinda Everitt http://ifyoublingittheywillcome.blogspot.com/
Debra Van Patten http://memoriesoftheheartbydeb.blogspot.com/
Carol Horton http://carol-scrappininparadise.blogspot.com/
Amy Edwards http://paisleysplayhouse.blogspot.com/
Helen Onulak http://www.hookedonstamping.com/
Traci Law http://www.papercraftingprincess.com/
Nikka Geers http://nikkageers.blogspot.com/

Until next time...
Debra

Wednesday, May 5, 2010

Cherry-O Party Favor

I am part of an artwork exchange hosted by my second upline, Diana.  Each Idea Book period, we make 20 of the same items and in exchange, we get back an entire display board of artwork using the new papers, stamps, and accessories from the latest Idea Book.  This month, I had to use the Cherry-O papers and coordinating stamps/accessories, as well as make a bag/box/topper.

I opted to make this diaper fold origami pouch. My original idea was to add a bag of Black Cherry Tea, but I could only find that in a variety pack and wasn't about to purchase enough boxes to come up with 20 tea bags. So, I opted to use the drink mix pouches that you can add to a bottle of water.

The directions for the pouch can be found on Splitcoast Stampers.  I used a 9x9 square to make my pouch. You can make small ones to add to card fronts and scrapbook pages, or large ones to fill with special treats. You can even use it to house an invitation or gift card! The possibilities are only limited by your imagination.


Stamps: Tasty Treats
Inks: Tulip
Accessories: Cranberry Ribbon (currently discounted 29%!), Expressive Font CD Volume I, 3D Foam Tape, Glue Dots


I used a label template from my Word Perfect program to do the instructions on the tags.  The instructions are printed using the Tall Pen font from the Expressives Font CD Volume I (currently discounted 38%!) Then I just stamped the frame stamp around each set of instructions and cut them out. I added a ribbon pull using a staple, but then glue dotted the tag to the pouch so I didn't staple through the pouch.


Until next time...
Debra

Thursday, December 31, 2009

January SOTM Blog Hop!

Happy New Year! And welcome to the January 2010 edition of our Stamp of the Month Blog Hop!

We will be featuring January's SOTM, which is True Friends, a set of 11 stamps. If you've come from Laurie's Blog, you're on the right path. We have over 50 Close To My Heart Consultants sharing their creations using this month's SOTM and other great CTMH products on their blogs. This is simple to do - just click on the link at the end of the post on each blog to move to the next one! Here we go!

For this month's hop, I chose to do a simple card showcasing the new Topstitch papers!   I stamped one of the label stamps in Vineyard Berry ink on Vanilla Cream Cardstock and cut it out.  The card pattern is from Wishes - one of the workshop cards.  The sentiment is stamped in Chocolate ink and again, just slightly off for a shadow effect, in Heavenly Blue ink.  I added just a touch of Chocolate ribbon.  The label is popped off the card with 3D dots for dimension.


I also thought this set would make and AWESOME border/banner/wrap.  My box didn't turn out as well as I had envisioned, but that's what I get for doing everything last minute.  For the wrap, I cut a piece of Vanilla Cream Cardstock at 3x12.  Then I stamped the label stamp 4 times making sure to line up the edges of the labels to create a continuous border.  Then I cut out the border strip - leaving just a tab at the end so that I would have something to glue to the inside of the wrap.  Carefully score between the stamped images for a box, or just wrap it around for a candle or other round object. 


Now "Hop" on over to Kimberly's Blog to see her work! Be sure to visit all the Consultants at their blogs to get some great crafting ideas and other fun ideas! The complete list of participants is here. Remember, the January SOTM is only available until January 31st! Contact your CTMH Consultant (or click here) to see how you can get this stamp set at a discount or even free!


Until next time...


Sunday, November 1, 2009

November Stamp of the Month Blog Hop

It's time for our wonderful Stamp of the Month Blog Hop again! We will be featuring November's SOTM, which is Around the Block, a set of 26 stamps. If you've come from Antoinette's Blog, you're on the right path. We have over 60 Close To My Heart Consultants sharing their creations using this month's SOTM and other great CTMH products on their blogs. This is simple to do - just click on the link at the end of the post on each blog to move to the next one! Here we go!

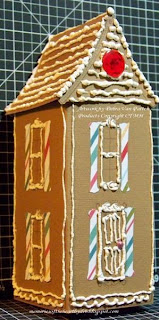
I was inspired by Karen Pedersen's gingerbread house cards. I figured if you could make a card, you could make a gingerbread house. It's not very often I design something, I'm usually CASE'ing and tweaking from someone else. I had fun letting my imagination guide me (that's scary).


I started out with a 4.5" x 9.5" piece of Desert Sand Textured Cardstock which I scored at 2.25", 4.5", 6.75", and 9". I stamped the house outline in Chocolate ink, as well as the door and windows. I traced all the stamped lines with Liquid Applique then heated with the Craft Heater to give it a frosting/icing look. (You can probably tell I don't do much frosting/icing!)

For the roof, I stamped the roof piece in Chocolate Ink on a piece of Desert Sand Textured Cardstock and cut out. The actual roof is 2.25" wide by about 6 inches. I scored at 1/4" intervals with the embossing stylus to give it a little texture and image of shingle lines. To join the roof to the front pieces, I started with glue dots to hold it in place then added a line of liquid adhesive to the inside to secure it (think caulking). I carefully trimmed the excess cardstock off the roof. Again, I traced the stamped lines with Liquid Applique, as well as the embossed lines on the roof, and heated with the Craft Heater.


The shutters are stamped on the olive side of the Jingle Level 2 stripe paper at an angle to resemble candy cane pieces. Then each was cut out and adhered to the house. I finished off the house with a couple of cranberry buttons from the Holiday Craft Buttons, and a Hollyhock Twinkle Brad (for the doorknob).

I hope you enjoyed my little gingerbread house. Now "Hop" on over to Jen's Blog to see her work! Be sure to visit all the Consultants at their Blogs to get some great crafting ideas and other fun ideas! The complete list of participants is here. Remember, the November SOTM is only available until November 30th! Contact your CTMH Consultant (or click here) to see how you can get this stamp set at a discount or even free!

If you get lost along the way, or find links that are broken/missing. You can get a complete list of participants at Jena's Blog.

Until next time...

Thursday, August 27, 2009

September Stamp of the Month - Sneak Peek

I realized it had been a while since I posted anything...working 6 days a week kinda does that on occasion. I actually got my scheduled day off today (first one in a while)...so I took a part of the day and played with some of the new Close To My Heart products from the Autumn/Winter 09 book. No, my disaster area is not clean and organized. In fact, after today, I believe it's worse :) But I had fun!


I did get a couple of swaps completed today. So, I thought I'd share one with you. For this project, I used the September Stamp of the Month, Treasures. Unfortunately, I cannot share a link with you since it's not yet been released. BUT, if you come back on the 1st of September, I'm taking part in the Stamp of the Month Blog Hop again this month, and you'll get to see the stamp set and a TON of amazing artwork!


Gift Bag (approx. 4" x 5")

Twitterpated Papers (new)

Chocolate Ink

VersaMark Ink

White Embossing Powder

Colonial White Ribbon

Colonial White Brads

Coluzzle Circle Template

Corner Rounder (for the scallops)

Ivory Eyelets (probably well retired, but the only ones I had close - the new Colonial White soft set eyelets would work well)

Until next time...


Thursday, July 9, 2009

Box in a Bag

This is my other project for today...the one I found while I was supposed to be looking up the Stamp of the Month Swap colors for August. Anyway, since I still had the Animal Cookies papers and inks out, I thought I'd go ahead an use those (no point in adding more stuff to my pile).

Again, the directions are from Splitcoast Stampers. I told you I love that place!

Here's where I used that scalloped circle creation from my tutorial earlier today. You'll see that I also used the corner rounder with the guide removed to do the scalloped border at the bottom of the box.

I'm thinking I probably shouldn't have used the gingham ribbon with the polkadot paper, but you know, I was using stuff from my stash. And anyone who knows me well, knows that I really have no fashion sense, nor do I pay much attention to the "rules" of said fashion.

Supplies:
Paper: Animal Cookies Level 2 Paper Packet
Stamps: You've Got Flair My Acrylix Stamp Set
Inks: Clover Meadow, Sunflower, Tulip, Dutch Blue, Desert Sand
Accessories: White Daisy Ric Rac, Summer Carnival Brads, White Daisy Eyelets, Dutch Blue Gingham Ribbon (retired), Sunflower Organdy Ribbon (retired)
Tools: Waterbrush, Corner Rounder, Coluzzle Circle, Knife, and Cutting Mat

Until next time...


Pizza Anyone?

Okay, so I don't mean a REAL pizza (sorry). But how about a mini pizza box? This was my first project of the day (remember those instructions that I'd found while trying to decide what I wanted to do?)

I found the instructions over at Splitcoast Stampers. I LOVE that place - always tons of neat projects and techniques to browse through.


Sunday, April 19, 2009

Booking Set Box

I've had this in my head since I saw the tutorial on Splitcoaststampers. While it was designed as a 3x3 Notecard Box, I figured it would also be perfect for our Booking Sets. I took a little time to try it this afternoon, while I was waiting on flowers and brads to dry for my Stamp of the Month cards :)


I used the card design associated with the Spring 09 Booking Set for the top of the box, just changing up the papers slightly.


Papers: Emporium Level 2 (Cocoa, Sweet Leaf, Indian Corn Blue, Colonial White)

Stamps: Spring 09 Booking Set - True Treasures

Inks: Cocoa

Accessories: Cocoa Organdy Ribbon, Staple

To achieve the postage stamp look, I used an 1/8" hole punch and punched only half the edge of the cardstock.

Here's the box opened, showing the Booking Set tucked nicely inside. What a perfect way to showcase the Booking Set and present it to Hostesses!

Until next time...

Related Posts with Thumbnails